Package Management
Introduction
One reason, why Python is widespread, is its vibrant community. This
community develops code to solve a variety of problems in the widest range of
scientific fields. This code is bundled and shared for free (as open-source) in
the form of packages. You can download and use these packages. The usage of
packages will facilitate your coding process as they offer implementations to
solve common problems. Therefore, you won't have to reinvent the wheel.
For example the package pandas is the go-to tool for data manipulation and
analysis. With pandas you can read text and Excel files
among a lot of other formats and it offers a
lot of functionality to manipulate and even plot your data. Hence, you will
rarely see Python projects that are not dependent on pandas. Apart from
pandas there are a wide variety of popular packages:
scipy- statistics (which will be covered in the next course)tqdm- build progress barsscikit-learn- for machine learningnumpy- scientific computing- ... and many many more
This section serves as a guide on how to install and manage packages. Additionally, the concept of virtual environments is explained.
Standard library
Python comes with a couple of modules which do not need to be installed and
can be used 'out of the box'. For simplicity, we will call these modules
packages as well. If you're interested in the difference between packages and
modules, Real Python has a nice
article on the topic.
Here is an extensive list of all
the packages that Python ships with.
Let's use the random package to generate some random numbers. First,
we have to import the package with the following command:
import random

# with the package imported we can use its functions
# e.g., random integer (between 1 and 100)
print(random.randint(1, 100))
Note, the output will be different when you run the code, since it is random.
The corresponding documentation is available here. Generally speaking, almost all packages offer an online documentation page. It is good practice, to consult these documentation sites as they offer a lot of information on how to use their package and which methods/functions are available. Usually, functionalities are illustrated with examples that can be a good starting point for your project.
Info
If you remember, random was used in one of the previous sections on
control structures to generate passwords of
variable length.
Calculate the median
Use the built-in statistics package to calculate the median of the
below given values. Use Google to search for the statistics
documentation page and try to find the appropriate function.
We will continue with another exercise.
Variance of random values
Generate a list of random values (can be integers and/or floats) and calculate
the variance. Hint: Use both the random and statistics
package.
Installing packages
To get access to all the packages available online, we need to install them
using a package manager. One such manager is pip which is automatically
installed alongside Python. To check if pip is available on your system
open a new terminal within VSC by navigating in the menu bar Terminal
New Terminal

and execute the following command:
... you should see a list of commands and their description:
Usage:
  pip <command> [options]

Commands:
  install                     Install packages.
  download                    Download packages.
  uninstall                   Uninstall packages.
  freeze                      Output installed packages in requirements format.
  inspect                     Inspect the python environment.
  list                        List installed packages.
  show                        Show information about installed packages.
...
Info
You can run shell commands directly from your notebook by using an exclamation
mark (!) as a prefix (e.g., !pip). However, in some cases, such as when
uninstalling a package, this approach may cause issues. Therefore, it's often
recommended to use the terminal instead.
Now, we'll install our first package, called
seaborn. To install a package use pip's
install command followed by the package name (pip install <package-name>).
Don't worry, it might take a couple of seconds.
seaborn is a quite common package to visualize data. Now, run the following
code to create your first plot. The code snippet was copied from the seaborn
documentation here.
# taken from https://seaborn.pydata.org/examples/grouped_boxplot.html
import seaborn as sns

sns.set_theme(style="ticks", palette="pastel")

# Load the example tips dataset
tips = sns.load_dataset("tips")

# Draw a nested boxplot to show bills by day and time
sns.boxplot(
    x="day", y="total_bill", hue="smoker", palette=["m", "g"], data=tips
)
sns.despine(offset=10, trim=True)
You don't have to fully understand the code snippet. It's more about the
successful usage of a package. You might have noticed, that you didn't solely
install seaborn. Among seaborn, pip also installed pandas (for data
handling). We can 'verify' that by checking the type of tips (from the code
snippet above).
Most of the time, a package does not 'stand on its own'. It uses the
functionalities of other packages as well. In our case, seaborn also needs
pandas to properly function. Hence, a lot of packages are dependent on each
other.
Remove a package
Remove the seaborn package. Like above, use pip within a terminal to list
all commands and find the appropriate one. Execute the command to remove the
package.
PyPI
You might wonder where pip downloads the packages?! In short, all packages
are downloaded from the Python Package Index (PyPI).
That's where the open-source community (usually) publishes their packages.
Simply put, if you type pip install seaborn, pip looks for a package called
seaborn on PyPI and downloads it. PyPI is a valuable resource if you're
searching for packages, certain versions, etc.
Virtual environments
Previously, we have installed the package seaborn. The package itself was
available system-wide as we did not create a virtual environment beforehand.
This means, if you open a new folder/project and you select the same python
kernel (typically the global python installation), the package will be
available and you do not need to install it again. That might not sound too
bad, but it's actually considered bad practice. But what is good practice and
what the heck is a virtual environment?
Why?
To understand virtual environments, let's use an analogy from everyday life: cooking in a kitchen. Imagine you are baking two different cakes in the same kitchen. One is a regular chocolate cake, and the other must be gluten-free because someone has an allergy.

Even though both cakes are made in the same kitchen, you would not casually reuse the same bowls, spoons, and surfaces without cleaning them carefully. If flour from the regular cake gets into the gluten-free one, the result is ruined - and potentially harmful.
So what do you do? You create separate, clean work areas with the exact ingredients and tools needed for each cake.
A virtual environment in Python works the same way.
- Your computer is the kitchen.
- Each project is a different recipe.
- The packages (like seaborn, numpy, or pandas) are the ingredients.
If all projects share the same global Python installation, it's like throwing all ingredients into one giant bowl. Sooner or later, versions clash, dependencies break, and one project can accidentally ruin another.
A virtual environment gives each project its own clean workspace, with its own set of packages and versions, completely separated from other projects - even though everything still runs on the same computer.

That is why using virtual environments is considered best practice.
To summarize, the pip/virtual environment combination facilitates:
- Dependency management: You can keep track of the packages that your
project needs to function. Packages are typically built on top of other
packages. For example,
seabornis built on top ofpandasandmatplotlib. If you want to useseaborn, you need to installpandasandmatplotlibfirst and sometimes in a specific version. - Version management: You can specify the exact versions of a package that your project needs. This is important, because different versions of a package may have different functionalities or bugs.
- Environment management: It's easier to work on multiple projects on a single machine as you can install multiple versions of a package on a per-project basis.
- Shareable: Your projects will be shareable with other developers as they can easily install all dependencies with a single command. No more "it worked on my machine" excuses!
How?
To work with virtual environments, you need to follow three steps:
The three steps to work with virtual environments
- Create a virtual environment
- Activate the virtual environment
- Select the virtual environment as your Jupyter or Python kernel
Create a virtual environment
To create a virtual environment, open a new command prompt within VSCode (you
can use the shortcut Ctrl + Shift + ö). Check if the terminal is
opened in the correct folder. This should be your current project folder. If
not, you can change the folder by typing cd <path/folder-name> in the
terminal or by right clicking in the file explorer and selecting "Open in
Integrated Terminal".
Then execute the following command:
This command creates a new folder called .venv within your project folder.
Instead of .venv you can choose any name you want. However, this section
assumes that you named it .venv.
Warning
The virtual environment folder should never be touched by the user. Initially a clean copy of your global Python installation will be created. This includes absolute paths to the Python installation and the Python executable. Therefore the virtual environment folder cannot be moved or sent to another machine.
Furthermore, your Jupyter or Python files should always be in the project folder. NEVER in the virtual environment folder. A typical structure of a project folder might look like this:
Activate an environment
So far we have created the virtual environment. But that is not enough. We need to activate it in order to use it. Depending on your operating system, the command to activate the environment is slightly different.
Once the environment is activated, you can see the name of the environment
(here .venv) in the terminal.

From now on, every package you install from this activated terminal (for
example with pip install) will be installed into the virtual environment. In
VS Code or Jupyter you also need to select this virtual environment as the
Python/Jupyter kernel for your notebook or script (see next section); this
kernel selection is separate from activating the environment in the terminal.
Use activation whenever you run terminal commands that should use the virtual
environment. Note that once you close the terminal or VS Code, the environment
in that terminal will be deactivated, but files that use the
virtual-environment kernel will still run with the packages from that
environment.
Deactivating the environment is the same on all operating systems. To deactivate it, simply use
in your command prompt/terminal.
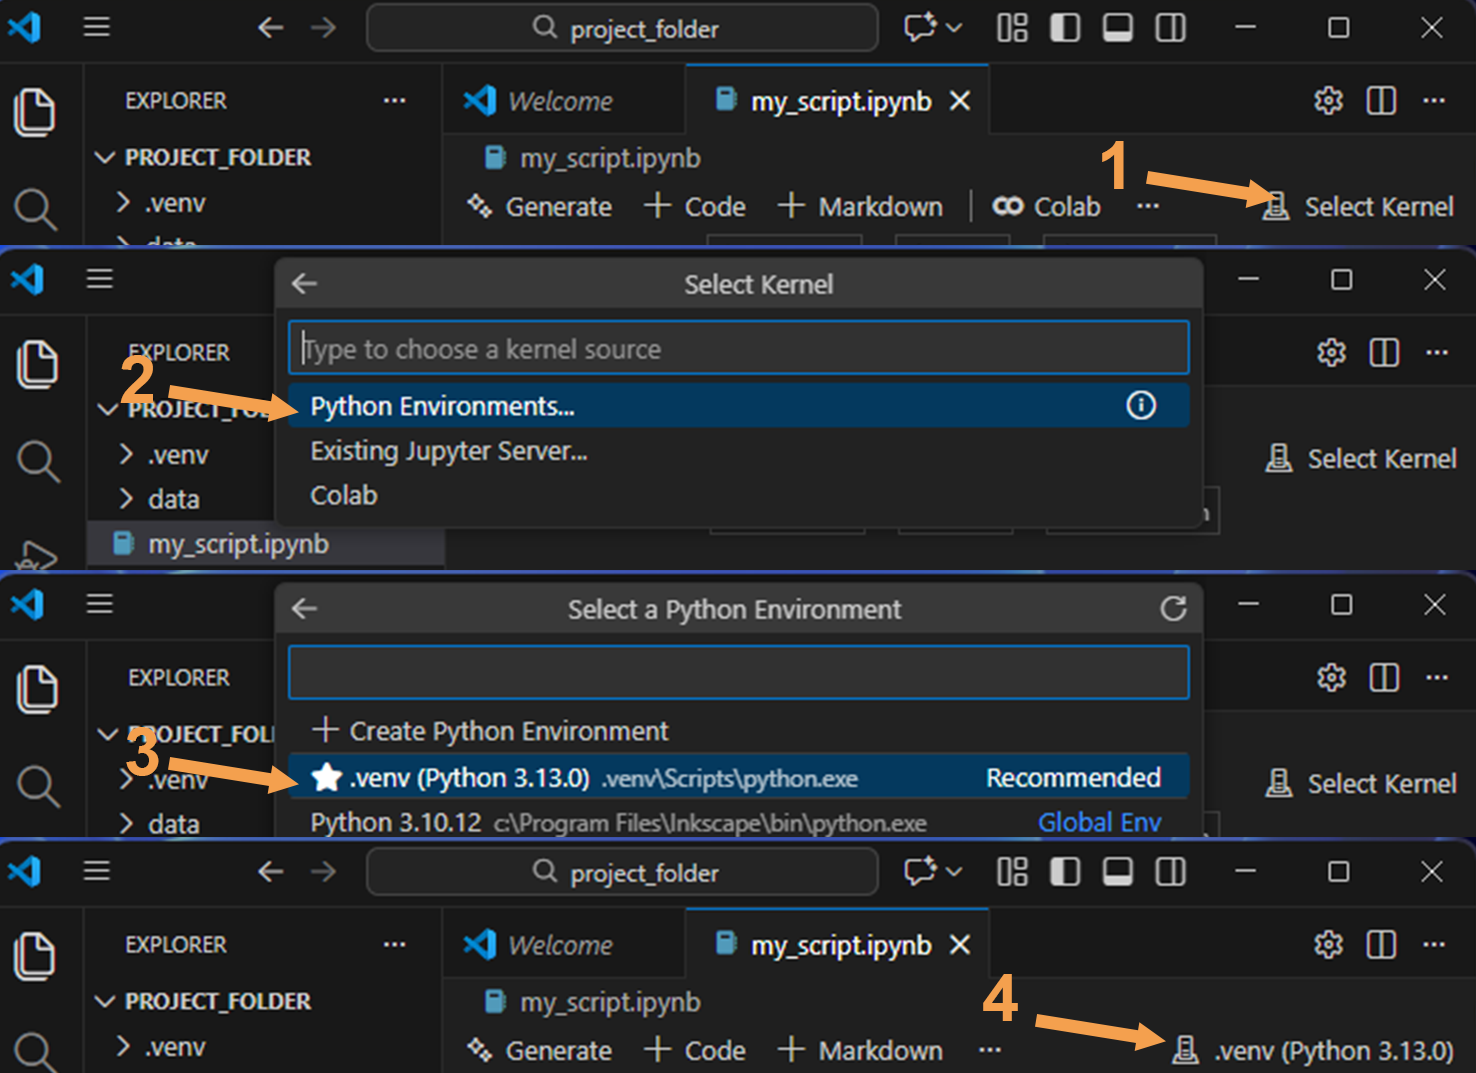
Select the virtual environment
So now we have created the virtual environment and activated it in order to install packages. Now the third and last step is to select the virtual environment for your file as Jupyter or Python kernel.
Fit a machine learning model
Assuming your virtual environment is activated, try to get the following code cell running.
from matplotlib import pyplot  # (1)!
from sklearn.datasets import fetch_california_housing  # (2)!
from sklearn.tree import DecisionTreeRegressor, plot_tree

# load data
X, y = fetch_california_housing(return_X_y=True, as_frame=True)

# fit a decision tree
tree = DecisionTreeRegressor(
    random_state=784, max_depth=2, min_samples_leaf=15
)
tree.fit(X, y)

# visualize the tree
plot_tree(tree, filled=True, feature_names=X.columns, proportion=True)
pyplot.show()
pyplotis a submodule ofmatplotliband can be directly imported with thefromstatement.- Or you can import functions (like
fetch_california_housing()) directly from its submoduledatasets.
Install the packages matplotlib and scikit-learn with pip. Then try to
execute the code cell.
Congratulations 🎉, you've just fitted a machine learning model (simple decision
tree) on a data set and visualized the model. That's the power of Python -
easily accessible packages with a lot of functionality ready to use. 🦾
Don't worry too much about the actual code lines above. Again, the important thing is to get the code running. With the above exercise, you've reproduced the result from the motivational section.
requirements.txt
As we have mentioned before, virtual environments are a great way to isolate
project dependencies. However, sharing the whole virtual environment folder
(e.g. .venv) is impractical. It often contains thousands of files,
OS-specific binaries and absolute paths, so copying it to another machine or
location usually breaks. A better approach is to export the environment's
installed packages to a simple text file that others can use to recreate the
environment no matter if they are working on MacOS, Linux or Windows.
Export dependencies
Assume you want to share the code snippet from the previous task with someone. First, your colleague might not know which packages you used to get the code running. With no more information, one has to read the code and manually determine which packages are necessary. To circumvent such situations, you export all your packages to a file. Open a command prompt/terminal and execute
A requirements.txt is written which contains all your used packages.
Your colleague can now take the file and install all packages needed, at once.
... is the corresponding command.
Info
A requirements.txt file is a common way to share project dependencies.
However, it will also help you, to restore your environment, in case something
goes wrong. Hence, keep your requirements file up-to-date.
Other choices?/Outlook
Apart from pip there are a couple of other package managers available. For
example, there are
... and this is by no means an extensive list. All of these tools let you
install and manage packages. Nevertheless, they have their differences. In the
end, it is up to you, the developer which tool fits best. pip is always a
solid choice (and the go-to choice to get the hang of package/virtual
environment management). However, if you're working on larger scale projects
with a couple of other developers, one of these package managers might offer
some functionalities which facilitates the development workflow.
Recap
In this section, you have learned how to install packages and manage them within virtual environments. The topics covered:
pip- How to install/uninstall packages
- PyPI - the package hub
- Concept and benefits of virtual environments
- Creation and basic usage of a virtual environment