Getting Started with YOLO
Introduction
Remember the object detection approaches we covered earlier? YOLO revolutionized this field when it was introduced in 2015. Instead of using complex pipelines or scanning an image multiple times, YOLO takes a refreshingly simple approach: it looks at the image just once (hence the name "You Only Look Once") to detect all objects.
Historical Context
When YOLO was first released, object detection systems were complex multi-stage pipelines. The original paper titled "You Only Look Once: Unified, Real-Time Object Detection" by Joseph Redmon et al. introduced a radically different approach that would change the field forever.
The YOLO Approach
Let's break down how YOLO works in simple terms:
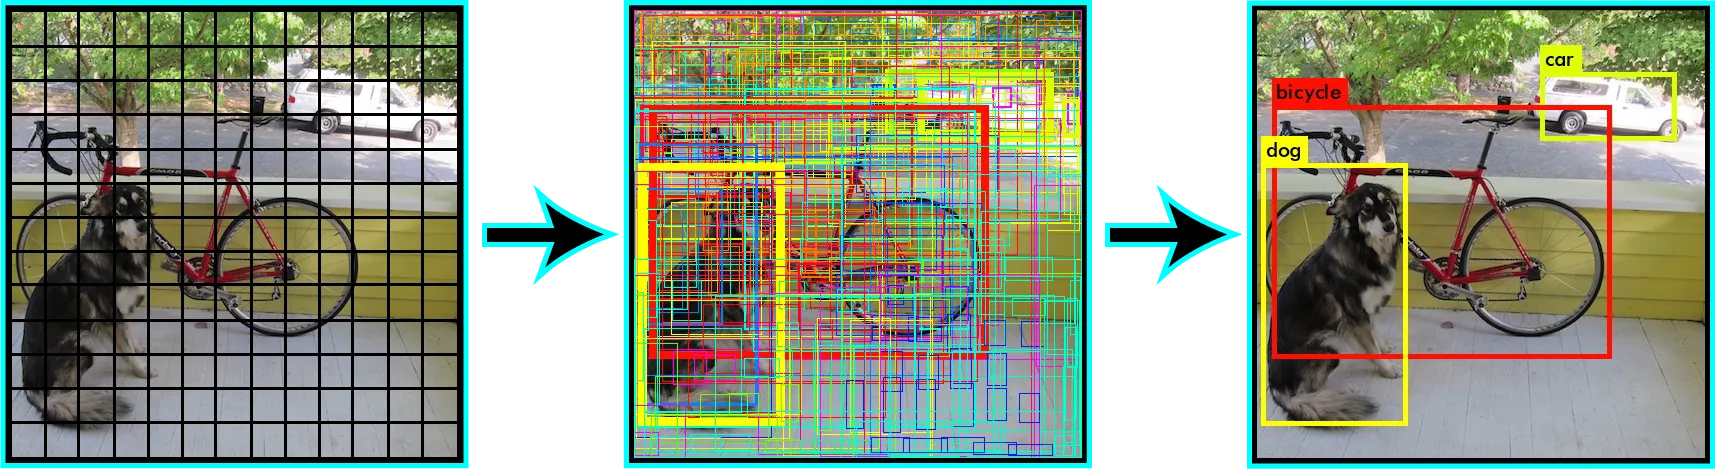
- Grid Division: YOLO first divides your image into a grid (say 13x13).
- Grid Cells Predictions: Each cell in the grid is responsible for predicting objects centered in that cell. Each cell predicts a certain number of bounding boxes and confidence scores for those boxes. A confidence score reflects how confident the model is that the box contains an object and also how accurate it thinks the box is.
- Bounding Box Parameters: Each bounding box has five predictions:
x,y,w,h, and a confidence score. (x,y) coordinates represent the center of the box relative to the bounds of the grid cell. Width (w) and height (h) are predicted relative to the whole image. Finally, the confidence score represents the likelihood that the box contains an object and how accurate the box is. - Class Predictions: In addition to predicting bounding boxes, each cell also predicts class probabilities. These probabilities are conditioned on the grid cell containing an object.
- Combining Predictions: The bounding box predictions and class predictions are combined to create a complete detection. If a grid cell is confident that it contains an object, and if the predicted class score is high, then it’s a strong detection.
- Non-Max Suppression: Since YOLO predicts multiple boxes for each grid cell, it uses a technique called non-max suppression
Here's a visualization of how YOLO divides an image and makes predictions:
Task: YOLO Approach
Watch the following video about YOLO and answer the questions below:
Basics:
- In basic object detection, what two main things does YOLO need to determine about an object?
- What happens when no object is detected in a grid cell?
- True or False: YOLO must always use a 4x4 grid to divide images.
- Which is faster at detecting objects: YOLO or older methods like R-CNN?
- What are the components of YOLO's 7-dimensional output vector for a single grid cell prediction?
Advantages and Disadvantages
Let's examine what makes YOLO special and where it might not be the best choice:
-
Advantage
- Speed: YOLO is blazingly fast, capable of processing images in real-time
- Accuracy: Despite its speed, it maintains good detection accuracy
- Global Context: By looking at the entire image at once, YOLO understands context better than sliding window approaches
- Generalization: YOLO learns generalizable representations of objects
-
Disadvantage
- Small Objects: YOLO can struggle with detecting small objects, especially in groups
- Unusual Aspects: Objects in unusual aspects ratios or configurations might be missed
- Precision: While fast, it might not be as precise as two-stage detectors for some applications
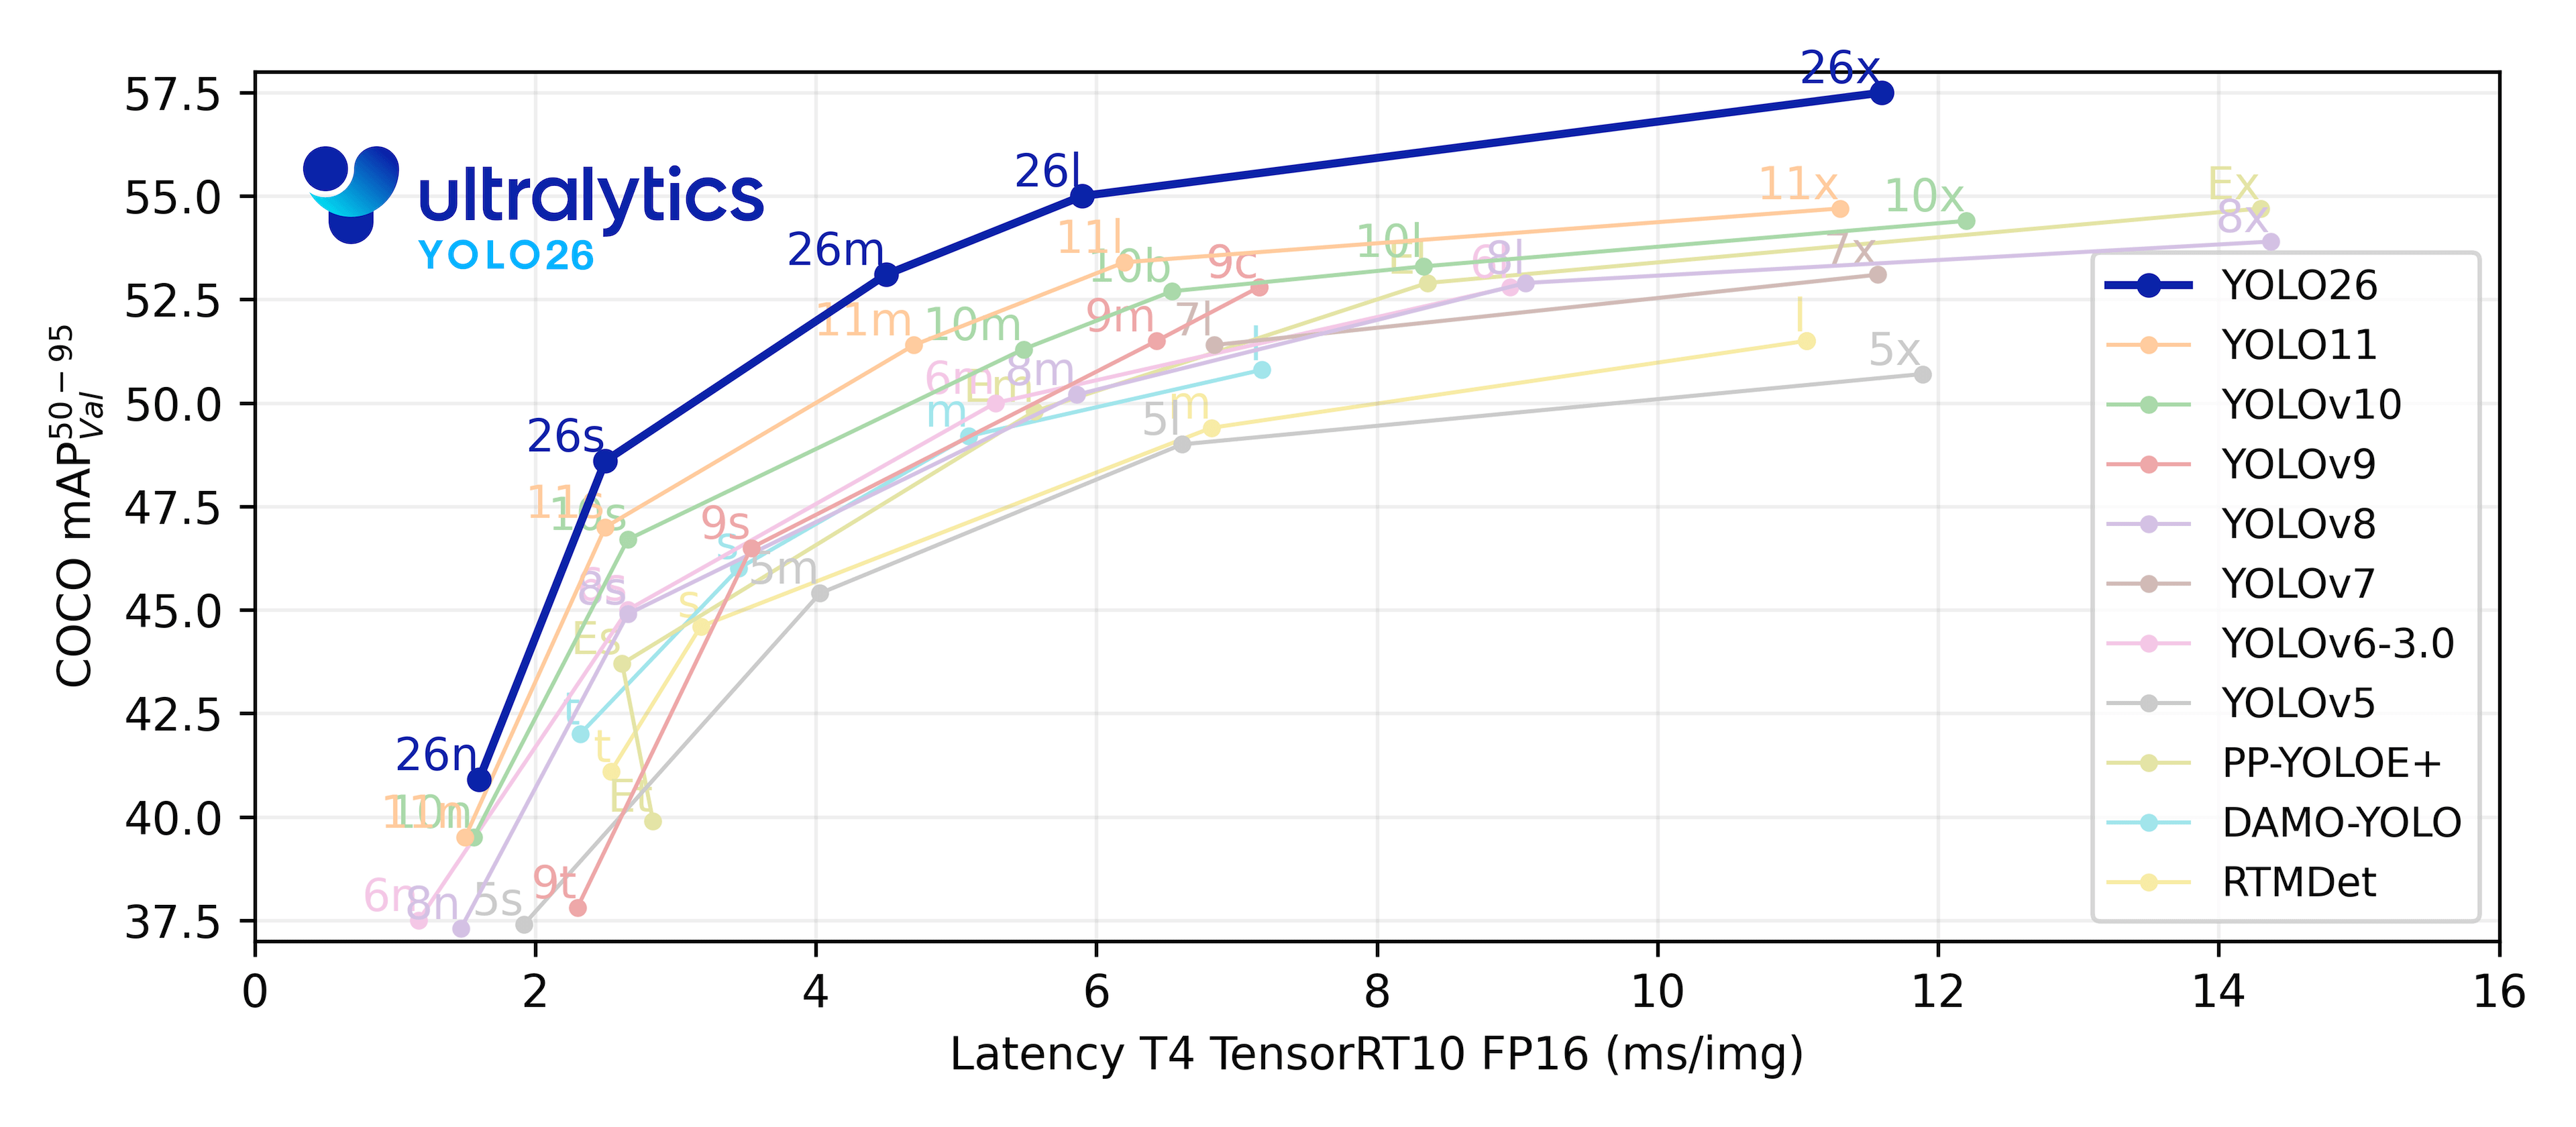
YOLO Versions
The YOLO family has evolved significantly since its introduction in 2016. Each version brought important improvements:
YOLOv1-v3 (2016-2018)
- YOLOv1: First version, introduced the grid-based approach
- YOLOv2/YOLO9000: Added anchor boxes, batch normalization
- YOLOv3: Implemented feature pyramid networks, better backbone (Darknet-53)
YOLOv4-v5 (2020-2021)
- YOLOv4: Introduced Mosaic augmentation, CSPNet backbone
- YOLOv5: Brought PyTorch implementation, improved training methods
Latest Versions (2022-2024)
- YOLOv6: Released by Meituan, optimized for industrial applications
- YOLOv7: Improved architecture design and training strategies
- YOLOv8: Ultralytics' flagship model with multi-task capabilities
- YOLOv9: Introduced revolutionary new features
- YOLOv10: Enhanced previous versions' capabilities
- YOLOv11: Latest iteration with significant improvements
Installation and Setup
Getting started with YOLO is straightforward. You can use the Ultralytics implementation of YOLOv11, which offers a user-friendly API and excellent documentation.
-
First, create a new project folder and virtual environment and activate it:
-
Install the required packages:
-
Verify your installation:
Installation Tips for Pro's
If you're using a GPU, make sure you have the correct CUDA version installed
Reading the Docs
The Ultralytics documentation is your best friend when working with YOLO. Here are the key resources you should bookmark:
Documentation Best Practices
- Keep the API reference handy for specific function documentation
- Check the examples section for common use cases
- Join the Ultralytics Discord community for help and updates
What's Next?
In the upcoming sections, we'll dive deeper into:
- Working with pretrained models
- Analyzing images and videos
- Preparing custom datasets
- Training YOLO on your own data